ITEEDU
iPhone电子罗盘雷达定位系统的设计与实现
Ar项目是在iphonearkit的基础上进行开发的。在熟悉了iphonearkit工具包之后,我们开始在其上添加其他功能和相应的界面设计。
首先,进行了电子罗盘设计,已达到雷达定位系统的功能。
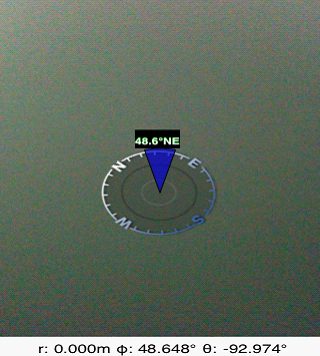
其添加完毕后的界面如图所示:

iPhone电子罗盘实现难点总结:
1. 罗盘的实现关键代码:
- (void)viewDidLoad
{
    [super viewDidLoad];
//添加罗盘图片,图片符合上N,下S,左W,右E
    contentView = [[[UIImageView alloc]initWithFrame:CGRectMake(100, 200, 120, 120)]autorelease];
    [contentView setImage:[UIImage imageNamed:@"radar.png"]];
    [contentView setUserInteractionEnabled:YES];
    //self.view = contentView;
    [self.view addSubview:contentView];
//地理位置信息管理器,并设置其代理
     self.locationManager = [[[CLLocationManager alloc] init]autorelease];
    self.locationManager.delegate = self;
    //判断设备是否具备硬件支持,支持则开启磁力感应
    if ([CLLocationManager headingAvailable]) {
        self.locationManager.headingFilter = kCLHeadingFilterNone;
        [self.locationManager startUpdatingHeading];
    }
 }

//回调方法,self.headingImageView为UIImageView对象,放张带指示箭头的图片
- (void)locationManager:(CLLocationManager *)manager didUpdateHeading:(CLHeading *)newHeading {
    //根据角度旋转图片 ,newHeading.magneticHeading为夹角
    CGAffineTransform transform = CGAffineTransformMakeRotation(-1 * degreesToRadians(newHeading.magneticHeading));
    self.contentView.transform = transform;
}
2. 绘制图层并添加textLabel
注意:
(1)将扇形和textLabel放在绑定在一起,避免后续逐个设置位置;
(2)继承的是UIView,而非UIViewController;
(3)其相对位置,是以扇形为圆的最左最顶为(0,0)坐标,故textLabel的纵坐标是负值。
新建类 DrawView
DrawView.h:
#import <UIKit/UIKit.h>
@interface DrawView : UIView {

UILabel *textLabel;
}
@property(nonatomic,retain)UILabel *textLabel;
@end
DrawView.m的实现
#import "DrawView.h"


@implementation DrawView
@synthesize textLabel;

#define PI 3.14159265358979323846
#define radius 100

static inline float radians(double degrees) {
    return degrees * PI / 180;
}
- (id)initWithFrame:(CGRect)frame {
    if ((self = [super initWithFrame:frame])) {
        // Initialization code
        [self setBackgroundColor:[UIColor clearColor]];
        textLabel = [[[UILabel alloc]initWithFrame:CGRectMake(35,-25,80,20)]autorelease];
         textLabel.text = @"1234";
        textLabel.font = [UIFont boldSystemFontOfSize:20]; //字体大小
        textLabel.textColor = [UIColor whiteColor]; //字体颜色
        [textLabel setBackgroundColor:[UIColor blackColor]];//textLabel的背景色
        textLabel.textAlignment = UITextAlignmentCenter;//内容显示格式居中
        textLabel.adjustsFontSizeToFitWidth = YES; //自适应宽度
        textLabel.highlighted = YES;  //高亮显示
        textLabel.shadowColor = [UIColor greenColor];  //阴影
        textLabel.userInteractionEnabled = YES;  //用户相互交互
        textLabel.sizeToFit;  //大小自适应字体
        [self addSubview:textLabel];//这里是self而非self.view
    }
    return self;
}

- (void)drawRect:(CGRect)rect {
     CGContextRef context =UIGraphicsGetCurrentContext();
    float angle_start = radians(255);  //扇形的起始弧度
    float angle_end = radians(285);  //扇形的结束弧度
     CGContextSetFillColor(context, CGColorGetComponents([[UIColor blueColor]CGColor]));
//填充颜色
    CGContextMoveToPoint(context, 60, 60);//扇形中心位置
    CGContextAddArc(context, 60, 60, 60, angle_start, angle_end, 0);
//绘制扇形,其中第四个参数为半径
    CGContextClosePath(context);
    CGContextDrawPath(context, kCGPathFillStroke);
}

- (void)dealloc {
    [super dealloc];
}
@end
3.textLabel中的显示内容计算
该处应用了一个算法,具体如下:
NSString *dirTxt = nil;
    int bearing = (int) radiansToDegrees([self.centerCoordinate azimuth]);
    int range = bearing/ (360/16);
    // TODO: get strings from the values xml file
    if (range == 15 || range == 0)
    {
        dirTxt = @"N";
    }
    else if (range == 1 || range == 2)
    {
        dirTxt = @"NE";
    }

    else if (range == 3 || range == 4)
    {
         dirTxt = @"E";
    }
    else if (range == 5 || range == 6)
    {
         dirTxt = @"SE";
    }
    else if (range == 7 || range == 8)
    {
         dirTxt = @"S";
    }
    else if (range == 9 || range == 10)
    {
         dirTxt = @"SW";
    }
    else if (range == 11 || range == 12)
    {
         dirTxt = @"W";
    }
    else if (range == 13 || range == 14)
    {
        dirTxt = @"NW";
    }
    drawTextandPoint.textLabel.text = [NSString stringWithFormat:@"%.1f°%@",radiansToDegrees([self.centerCoordinate azimuth]),dirTxt];
注意:一定先要转换成弧度哦。
其他的模块,后续再贴^.^