ITEEDU
Designing Your Screen in XML
Because designing a screen in code can be cumbersome, Android supports an
XML syntax to design screens. Android defines a large number of custom
elements, each representing a specific Android View subclass. You can design a
screen the same way you create HTML files, as a series of nested tags, saved
in an XML file inside the application's res/layout/ directory. To
learn what elements are exposed, and the format of the XML file, see Layout Resources. Each file
describes a single android.view.View element, but
this element can be either a simple visual element, or a layout element that
contains a collection of child objects (a screen or a portion of a screen).
When Android compiles your application, it compiles each file into an
android.view.View resource that you can load in code by calling
setContentView(R.layout.layout_file_name) in your Activity.onCreate()
implementation.
Each XML file is made of tags that correspond to Android GUI classes. These tags have attributes that roughly correspond to methods in that class (for example, EditText has a text attribute that corresponds to EditText.setText).
Note that there is not an exact correspondence between class and method names, and element and attribute names — they're close, but not always 1:1.
Also note that Android tends to draw elements in the order in which they appear in the XML. Therefore, if elements overlap, the last one in the XML file will probably be drawn on top of any previously listed elements in that same space.
Each XML file is compiled into a tree rooted by single View or ViewGroup object, and so must contain a single root tag. In the following example, it evaluates to the outermost LinearLayout object.
Attributes named layout_something apply to that
object's LayoutParams member. Layout
Resources also describes how to learn the syntax for specifying
LayoutParams properties.
The following values are supported for dimensions (described in TypedValue):
- px (pixels)
- dip (device independent pixels)
- sp (scaled pixels — best for text size)
- pt (points)
- in (inches)
- mm (millimeters)
Example: android:layout_width="25px"
For more information about these dimensions, see Dimension Values.
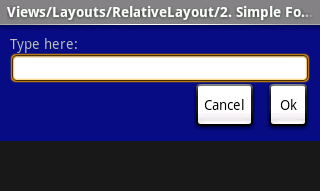
The following XML file creates the screen shown. Note that the text on the top of the screen was set by calling Activity.setTitle. Note that the attributes that refer to relative elements (i.e., layout_toLeft) refer to the ID using the syntax of a relative resource (@id/id_number).
<?xml version="1.0" encoding="utf-8"?>
<!-- Demonstrates using a relative layout to create a form -->
<RelativeLayout xmlns:android="http://schemas.android.com/apk/res/android
                android:layout_width="fill_parent"
                android:layout_height="wrap_content"
                android:background="@drawable/blue"
                android:padding="10px">

    <TextView id="@+id/label"
              android:layout_width="fill_parent"
              android:layout_height="wrap_content"
              android:text="Type here:"/>

    <EditText id="@+id/entry"
              android:layout_width="fill_parent"
              android:layout_height="wrap_content"
              android:background="@android:drawable/editbox_background"
              android:layout_below="@id/label"/>

    <Button id="@+id/ok"
            android:layout_width="wrap_content"
            android:layout_height="wrap_content"
            android:layout_below="@id/entry"
            android:layout_alignParentRight="true"
            android:layout_marginLeft="10px"
            android:text="OK" />

    <Button android:layout_width="wrap_content"
            android:layout_height="wrap_content"
            android:layout_toLeftOf="@id/ok"
            android:layout_alignTop="@id/ok"
            android:text="Cancel" />
</RelativeLayout> |
 |
Loading the XML Resource
Loading the compiled layout resource is very easy, and done with a single call in the application's onCreate() method, as shown here:
protected void onCreate(Bundle savedValues)
{
   // Be sure to call the super class.
   super.onCreate(savedValues);

   // Load the compiled layout resource into the window's
   // default ViewGroup.
   // The source file is res/layout/hello_activity.xml
    setContentView(R.layout.hello_activity);

   // Retrieve any important stored values.
   restoreValues(savedValues);
}